We use cookies to enhance your browsing experience and analyze our traffic. By clicking "Accept", you consent to our use of cookies. Learn more.
Planting Instructions
Basic guidelines for planting, watering, and mulching are outlined below. Be aware that each plant species may have unique planting and cultural requirements. For best success we strongly recommend researching the specific requirements of the plant species you are working with and seeking advice from a nursery professional to ensure appropriate measures are being taken. Soil testing and selecting appropriate plants to match your site are also strongly recommended.
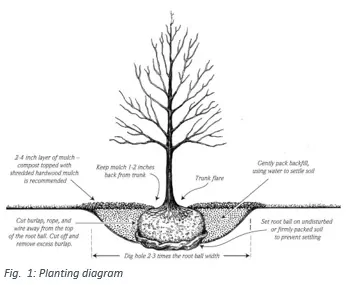
Step 1- Identify the Root Flare (For Trees): The root flare is the broadening of the trunk located at the base of the plant near the root/stem interface. It is important to identify the root flare prior to planting as it indicates where the root system begins and provides a guide for proper planting depth. The base of the root flare should be positioned at the soil surface. Occasionally, during mechanical digging the root flare is buried several inches beneath the soil within the root-ball. This accumulation of soil against the trunk can cause circling and J-shaped roots, which will lead to girdling and premature plant death. This excess soil must be removed prior to planting.
Step 2 - Measure Root-Ball Size: Measure the height and width of the root-ball to aid in the determination of approximate hole depth and width. Depth should be determined based on a measurement from the base of the root flare to the bottom of the root-ball.
Step 3 - Hole Preparation: Dig the hole, making sure it’s no deeper than the height of the root-ball (use your measurements from step 2, above). Take care to limit disturbance of the soil in the bottom of the hole as this can cause the root-ball to settle leading to improper planting depth. The hole should be dug approximately twice as wide as the diameter of the root-ball. In heavy clay soils it is also important to break up the soil on the sidewall of your planting hole to prevent glazing. As a general guideline, the wider the planting hole the better, as it is easier for the plant to establish its new root system into this newly backfilled soil due to larger pore space created by the act of soil disturbance.
Step 4 - Planting:
Container Plants: Carefully remove the plant from its container and inspect the root-ball for circling and matted roots. The roots should be loosened and teased apart to facilitate growth into the surrounding soil. The base of the root flare should be level to or slightly above the soil line.

Balled and Burlapped Plants: Once you have revealed the root flare and properly prepped your planting hole, it is time to move the plant into the hole with the remaining burlap intact. If there is a wire cage on the plant, it should also be left on. Once in the hole and at the appropriate depth, stabilize the plant by covering the bottom half of the root-ball with soil removed from the planting hole. The burlap, twine, wire cage and other material on the upper half of the root-ball can then be cut off and removed and, at this point, you should remove excess soil from the top portion of the root-ball. This is also the ideal time to check for J-shaped and circling roots that can cause girdling in the future. If any circling and J-shaped roots are found, use a pair of sharp pruners or a pruning saw to remove them. Burlap and other material on the bottom half of the plant should be left intact, as it will break down naturally in time.
Once plants are positioned properly, the hole can be back filled with your native soil. Be sure to break up any large clumps of soil, and gently tamp down the soil to eliminate large air pockets and ensure proper root-soil contact. Though amendments may be added at this time, we strongly recommend treading lightly and basing supplements off recent soil test results, the specific needs of your plant species, and nursery professional recommendations.
Step 5 - Watering: Thoroughly water the plant. The initial watering event should be sufficient to ensure that the root-ball is well moistened and that any air pockets are removed. Typically, the first watering event is notably deeper than subsequent watering events will be. During the first growing season it is especially important to monitor and maintain the watering needs of your plant. Good watering techniques involve monitoring soil moisture regularly while adjusting the supply of water to match weather patterns, growth, siting, and the specific needs of your plant. In general, it is better to water deeply, less frequently rather than a little bit each day. This cycle of deep watering, ensuring the soil is saturated out to the dripline (the outermost circumference of the tree’s canopy) will encourage a strong radiating root system, not just surface root growth. Remember to keep in mind that overwatering can be just as detrimental as under watering.
Step 6 - Mulching: Mulch can be as important to the health of a plant as watering. Mulch can help regulate soil temperatures, retain soil moisture, suppress weeds, and add organic matter to the soil. We recommend mulching with a 2-3“ layer of aged pine bark. Care should be taken to ensure the mulch is not piled up against the trunk. Mulch piled against the trunk can harbor pests and excess moisture that can lead to plant decline.

Step 7 - Staking (For Trees): Many of our containerized trees are sold with a bamboo stake as support for new growth. This stake can remain in place for up to a year after planting if support is needed. If you are unsure of whether to remove the supporting stake, please check with one of our nursery professionals. When planted in undisturbed soil, most balled and burlapped trees, by virtue of their root-ball size and weight relative to the plant will not need staking. If necessary, a single 4-6 ft. stake driven at a 45-degree angle across the tree and secured with soft webbing will be sufficient. In high wind areas or with trees planted in soft/disturbed soil, double and triple staking may be done by attaching a soft guy-line (no wire!!) no higher than two-thirds the height of the tree. Guy-lines should be looped loosely enough around the trunk to allow for some movement with the wind in order to build meristematic strength. Regardless of method used, we recommend that stakes and guy-lines be removed after one year.
If you need more in depth information about planting this is an excellent reference: